ads

Showing posts with label Security. Show all posts

Tuesday, 8 March 2016

10 Tips To Tighten Security On Your Android Device

Smartphones have come to define us by being the portal to our online identity and as such should be treated with care and secured against any wrongdoing online (hacking) or offline (stolen). If you are not careful, losing your smartphone may mean more than just a loss in contacts and phone numbers. We’re talking about your social media accounts, your synced files, important documents, your emails, photos and messages.
Your entire information is traceable and downloadable and may be shared all over the World Wide Web if you are not careful enough.
While we’d love it if people don’t mess around with other people’s personal information, putting morale aside, this is the virtual world where thieves and hackers hide behind anonymity and are hard to trace. There is no one better to protect your own data, than you. We hope these tips and tricks will be of help in that endeavor.

1. Do Not Save All Of Your Passwords

Many users tend to save their passwords to online services and sites on their device, never once thinking about what it would mean to a person who got their hands on the phone. Avoid having all important passwords saved in your device particularly when it comes to banking or payment apps.

2. Use Android In-built Security

If you are running on Jelly Bean, you can have a screen lock and encryption enabled to further enhance your security. There are many types of screen locks available for you to choose from such as password, pin, pattern and face unlock, available in your Android settings. Even when setting pins or pattern locks, try not to make it easy for hackers to guess your password.

3. Lock Your Apps

It is necessary to lock your apps, especially the ones holding private information that you wish nobody but you could see. This is a second layer of security to prevent anyone from using your lost device particularly if they have managed to bypass your locked Android.
You can use a free app like App Lock for this exact purpose. The idea here is not to lock every single app in your device, just really data-laden ones like your email apps or file managers.
While you at it, avoid using a combination of a pin or pattern lock that can be traceable from the smudges of your screen (Yes, it is traceable).

4. The importance of app permissions

Before you begin installing an app from Google Play, a list of requested permissions will pop up to show you what permission the app requires. Apps require permissions to do things but not all of them are necessary.
Always read through the permissions to make sure they make sense and correspond to what the app actually does eg. an alarm app does not require a permission to access your text messages. This is a real important step because not all apps in the Play Store are safe.
While you’re at it, make it a habit to read the comments as well as the rating of the app that you are going to download. This helps you understand more about what the app really does without trying it out firsthand.

5. Securing Your Network

One of the most important thing in protecting your Android is to secure your network. Try to avoid using public WiFi whenever you want to do something important like doing your banking online. As long you are sharing the same network with the public, they can easily sniff out your packets and translate it into actual data of your private information i.e. your passwords.
You can protect your information by using apps like Hideninja VPN so that your outgoing connection is always encrypted, making it harder for anyone to sabotage your data. If you suspect that your device is being attacked, WiFi Protector can help fend off these attackers. To further enhance your network security you can apply settings from SecDroid but note that this app is only for rooted phones.
Network Security

6. Use Mobile Security App

It will make your job easier to have an app that handles most of your security issue. Find a mobile security app that you are comfortable using, for example: Lookout Security & Antivirus and avast! Mobile Security. Even with a security app, you shouldn’t let your guard down as Android malware is getting stronger and more rampant, which brings us to the next tip.

7. Create Multiple User Account To Protect Privacy

If you own an Android tablet and have to share it with a sibling, a spouse, or your kids, having multiple user accounts will help each of you protect your privacy. In Jelly Bean for tablet, there is an option for you to create multiple user accounts. You can create another general account for anyone who wants to use your device. The option is under the Settings > Users section.

8. Prepare A Backup Of Your Data

A backup of your precious data is a must-have in the day and age of smartphones. Picture the worst case scenario where your Android device has been stolen or hacked. The last thing you can do is perform a remote wipe (see #10). Without a backup, you will lose all your information in your device.
Even if you could retrieve your stolen phone, chances are that hackers that have managed to access your device will render it useless. If you have a backup however, you can still restore your Android device back to its original state. You can choose to backup important information to the Cloud, your desktop or even to a flash drive, for insurance.

9. Track Your Lost Device

So you have a backup already but you really want to get your lost device back. Well, as the smartphone industry would have it, your phone is built to be trackable, via GPS. The catch is, you have to enable GPS on your phone for it to be tracked. Fret not because, there are plenty of device-tracking apps for Android that can help you locate your lost or stolen device, some can even turn on the GPS on your phone remotely.

10. Enable Remote Wipe

So you are at the point where you have everything installed and ready to go. But, you still need one last feature – the ability for you to wipe your device remotely. This is necessary, especially when you are sure that your Android is lost (forever). There’s no crying over spilt milk now – we can only prevent them from turning it into cheese.
I recommend 3CX Mobile Device Manager because it is free and easy to use. You can sign up for the account  and let just hope that the day you need to use their remote wipe feature will never come.
Remote Wipe
Read More »

Monday, 7 March 2016

How To Disable Ubuntu User Login Window

If you are are the sole user of your computer and are annoyed by the Ubuntu login window during every startup, it is better to remove it. Removing the login window will not actually remove the login password, but it will just skip the step during system startup.
Note: Make sure that you do not remove the login window on a public computer.

To remove it, first go to Login Window utility from System > Administration > Login Window.
load-autologin
You  can also load it  by pressing  Alt + F2 and typing gksu /usr/sbin/gdmsetup in Run Application box. login-window-alt-f2
This will open the Login Window Preferences window. Now, to enable auto login, go to Security tab and check Enable Automatic Login and enter user name for your system. You can also set delay in auto login by checking Enable Timed Login and selecting time in seconds. If you enable it, your system will wait for specified number of second before logging you.
security-tab
Click Close and reboot your system. Now you won’t see the login windows anymore and won’t need to type the password during every startup.  Enabling automatic login is not recommended because it will lead to higher security risk. Enjoy!

Read More »

How To Easily Disable Auto-Login Of Last User At Windows 8 Startup

Users Accounts are meant to provide a personal space to each user on a shared computer and therefore, a Windows User Account holds a lot of information related to the owner of that account including financial information, personal documents, passwords to email, social networking and communication accounts, browsing history and several logs. Therefore, if an unauthorized person finds a way of accessing someone else’s account, it can possibly have serious consequences for the account owner. So to be safe, most users protect their user accounts with a password. One annoyance with the login system in Windows 8 is that if there are multiple users added, the computer automatically boots up the account of the last user without asking for password, unless the user has set a PIN. While this is fine if only one person uses the computer, it can result in a breach of privacy in case of multiple users. User List Enabler for Windows 8 takes care of this issue by bringing up the user list at every system startup, allowing you to choose an account for login every time you boot up the computer.

The tool uses the group policy’s ‘logoff script’ method and sets the user switch DWORD value in Windows Registry to 1 at every logoff. The application provides you with a one-click solution for the purpose, eliminating the need to directly mess with Registry entries. When user list is enabled, you will need choose an account to login at every system boot, and provide the password for it. Just run the tool and click the Enable user list button to enable it.
User List Enabler
The utility also lets you revert this change in one click, so if you need the user list just for a specific time period, you can enable it for the time being, and disable it once you are done. For instance, if you are in a situation where you have to share the computer with another person for a few days, you can make a new user account for them, enable this feature to make sure they can’t access your account if you last used the computer, and when the need is over, just select the ‘Reset to defaults’ button in the tool to set everything back to the way it was.


User List Enabler is a portable application and works on both 32-bit and 64-bit versions of Windows 8.
Read More »

How To Disable Login Screen In Windows 10

Your Windows PC, if you’re running Windows 8 or Windows 10, is tied to your Live account. When you login to your system you have to enter the same password that could open your Hotmail/outlook email account, log you into Skype, and even buy apps from the Windows App Store. Unfortunately, that’s also the only thing preventing access to your PC. If you aren’t too bothered about securing your computer with a password, and are just plain annoyed with having to login in repeatedly, there is a simple way to disable it so that you can just dive right in and start using your PC. Here’s how.

Right-click the Start button and select the Run option. Type netplwiz and hit enter.
windows 10
This will open the User Accounts window. There are other ways to open this window; you can use the Control Panel as well. The Run dialogue is the quickest way to open it. If you have several different accounts configured, choose the one that you would like to skip the whole login and password option for. Uncheck the ‘Users must enter a user name and password to use this computer’ and click Apply at the bottom.  windows 10
Restart your system and you will see you no longer have to enter a password to start using it. Disabling the password has pros and cons of course, so be mindful that you’re taking a layer of security off your system and trading it in for convenience by doing this.
Read More »

Friday, 4 March 2016

how to Bypassing Android Password/Pattern/Face/PIN


Android is one of the most popular SmartPhone Operating System. As of Now there are over a billion android users. Every android user must be familiar with Pattern/PIN lock/Face Recognition,a security feature which ensures authorized access to their devices.  But sometimes the users forget the pattern or they try the wrong pattern more than the permitted number of tries allowed,getting locked out. In this guide I have collected almost all possible methods to break/bypass a pattern/PIN/Face protected android device.

Disclaimer; Do at your risk. I am not responsible for any damages caused and hacking someone's phone is a crime.

Follow the below given methods one by one

Method 1 ( Only If Custom Recovery like Cwm, Twrp, Xrec,Etc... is Installed:)


Procedure:


1. Download this zip Pattern Password Disable on to your sdcard (using your PC, as you cant get into your phone)
2. Insert the sdcard into your phone
3. Reboot into recovery mode
4. Flash the zip
5. Reboot
6. Done!

Note : After Restarting if it still asks any pattern/PIN,just try some random pattern/PIN

Method 2 (For All Devices With Custom Recovery Installed )


Procedure (Using Aroma File Manager)


1.Download and Copy Aroma File manager.zip to your memory card.

2. Open your recovery (press volume Down + Power button or it can be different according to the phones. Generally the phones who have press able button on the middle they have to press all three buttons. Google for you pattern)

3. There will be an option in recovery called “mount”. Go in that option and then mount all the cache and everything what is there.

4. Then select “update” and select “apply update from SD/external” and select aroma file manger.zip file that you downloaded.

5. After Flashing or updating, the aroma file manger will open. Use volume keys for up/down and power button 2 select like you use to get into recovery.

6. In aroma File manager , Go to menu , which is located in bottom strip and then select Settings.

7. Go to bottom n select “mount all partition in startup ” then exit from aroma file manger.

8. Now after exit , re-update that aroma file again and it will open again.

9. Go to data >> and then System.

Then find ‘gesture.key’ (for pattern lock) and ’password.key’ (for password lock) then long touch on gesture.key or password.key and sum option will be prompted , choose delete and delete that file and restart.
Note : After Restarting if it still asks any pattern/PIN,just try some random pattern/PIN

Method 3 (No Custom Recoveries Installed)


Requirements. 


  • PC(Linux or Windows+Cygwin Installed)
  • USB Cable and
  • adb(Android Debug Bridge) installed.

How to install adb(Linux)


Open Terminal Type the below command and hit enter.
sudo apt-get install android-tools-adb

Follow the instructions until everything is installed.

How to install adb(Windows)


Download the .exe and run it.

Procedure


  • Connect the phone to the computer via USB(phone should be turned on).
  • Open a terminal window(Linux) or cmd(windows).
  • Type the below commands one by one,pressing enter.
adb devices
adb shell
cd data/system
su
rm *.key
  • That's all. Reboot the device. 

Note : After Restarting if it still asks any pattern/PIN,just try some random pattern/PIN

Method 4 (All Devices Via Adb - SQL Command)

  • Open terminal(Linux)/cmd(Windows) and type the following commands,each at a time,followed by enter. 
adb shell
cd /data/data/com.android.providers.settings/databases
sqlite3 settings.db
update system set value=0 where name='lock_pattern_autolock';
update system set value=0 where name='lockscreen.lockedoutpermanently';
.quit
  • Done. Reboot the device.

Note : After Restarting if it still asks any pattern/PIN,just try some random pattern/PIN


Method 5 (All Devices Via Adb - File Removal )


Procedure:


  • Open terminal(Linux)/cmd(Windows) and type the following command.
adb shell rm /data/system/gesture.key
That's it. You should be able to use the device without password/Pattern lock now. If it asks for password?pattern at startup just give any random pattern/PIN

Method 6 (All Devices With USB Debugging Enabled )


Procedure: (Primary Steps)

  • Download & Extract Bypass Security Hack program. 
  • Open SQLite Database Browser 2.0.exe in SQLite Database Browser.
  • Navigate to By-pass security Hacks folder and open Terminal/Cmd there. 
  • Run the file pull settings.db.cmd this will pull out the setting file out of your phone.
  • Drag settings.db and drop to SQLite Database Browser 2.0.exe program.
  • Navigate to Browse data tab, At table there, click to list down the selection & delete secure

Instruction To Remove Pattern Lock:


  • Continuing the above procedures,find the record named lock_pattern_autolock, and delete it.
  • Close & save database
  • Run push settings.db.cmd and reboot your phone

Instruction To Remove PIN Lock:


  • From the list, find lockscreen.password_type, double-click it & change it's value to 65536, and apply changes. (Note: If that file is not there create it)
  • Next find lock_pattern_autolock, and delete record, If doesn't exist, Ignore
  • Close & save database
  • Run push settings.db.cmd and reboot your phone

Instruction To Remove Password Lock:

  • Find lockscreen.password_salt, Delete Record
  • Next find lockscreen.password_type, Delete Record
  • Close & save database
  • Run push settings.db.cmd and reboot your phone

As always give any random password/PIN/Pattern if it asks in the first boot.

Method 7 (Taking Precaution Before Lock Accident) :


As the title says,this method will act as a precaution, before you get locked up,while you still have access to the device.

  • SMS Bypass [Root Required]- Download  & Install It On Your Device. 
  • This App Allows You To Remotely Bypass Your Phone's Screen Lock By Sending A SMS.
  • It Removes Your Gesture Pattern Or Password After Receiving A Preset Keyword Along With A Secret Code Via SMS.
  • SMS Bypass App Requires Root.

Procedure:


1.First, make sure you give permanent root access to the app.
2.Change the secret code to your preferred choice. The default password is : 1234
3.To reset your screen lock, send the following message from another phone:
secret_code reset
Example:

1234 reset

Note 1 : There is a space between your secret code and reset. Also the secret code is case sensitive.
Note 2 : There is an option available to change the preset keyword. Default is : reset - Your phone will restart and your lock screen will be reset.

If None Of The Above Methods Work,Do Factory Reset/Full Wipe The Device
Read More »

Hack Windows 10 Login Password In few seconds

 computer technology

Forgot Windows Administrator Password? The first thing a normal user tries to do is take the PC to service center and do a  fresh re-installation of windows. In that case one may lose all the data,not to mention the service charges.  In another scenario,suppose if you want to hack into someone's PC there are a few methods to follow,like using Hiren CD,Trinity Rescue Kit,OphCrack etc. It takes considerable amount of time and computer skills and also these methods are not always successful. In such cases the below given method comes in handy.


Reset Windows 10 [Including Windows 8.1,8,7,Vista and XP] Password Without Knowing The Current Password. 


This is an old method,and it is based on a windows feature [Sticky Keys] found in all versions from the Old Windows XP to the latest Windows 10. Well it is a bit surprising to know that this classic windows backdoor works even in the latest Windows 10 !

Okey,So follow the below steps to Hack Windows 10.

Things you need-


1) Any Linux live CD(like Ubundu CD)/USB. If you don't have one download any Linux distribution ISO file and Make a bootable CD/USB. For simplicity sake I suggest Puppy Linux (lightest Linux distro,less than 200mb).

2)Basic knowledge in dealing with cmd,boot menu etc.

So let's get started.


1)Insert the live CD/Usb and boot from it. [You may need to Turn off Secure Boot feature for UEFI BIOS]

2)Locate the drive where Windows is installed.(C drive) Goto Windows/system32 folder.

3)Find out a file named 'cmd.exe' and rename it to 'cmd0.exe'

4)Next find another file by the name 'sethc.exe' [It is the program for windows sticky keys] Rename sethc.exe to cmd.exe.

5)Finally rename cmd0.exe to sethc.exe. [Swapping the sticky keys program with Command Promt (cmd). So whenever Sticky Keys program is called it runs cmd and vice versa. ]

5)Great! Now Shutdown and boot into Windows.

6)Press shift key five or six times at the login screen.

7)Now the command prompt will open up. Type this without quotes and hit enter.
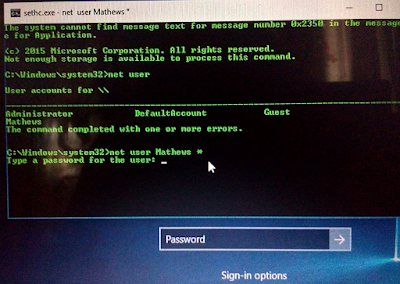
"net user"
 computer technology

 8) Now you can see the list of active accounts [User Names] in the PC. Make a note of the Account Name you need to hack.

9) type the following command and hit enter.
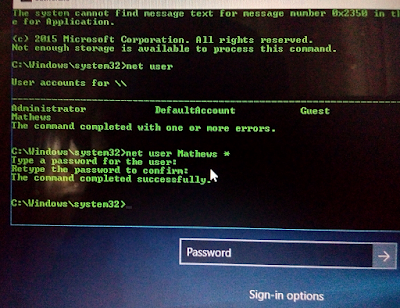
"net user <space><Account Name><space> *"
 computer technology

 Note  <space>: leave space

          <Account Name> Replace it with the account you need to hack. In this example 'Mathews'

8)It will display 'enter new password'. Enter any new password and confirm. To remove password leave it blank.
 computer technology

Done! You can login with the new password now.
Read More »

Saturday, 27 February 2016

how to Password/protect a PDF document

PDF files are quite common these days, being used for both business and personal use. It comes with different features and functions, including Graphics, page order, Carpool working, etc. which are quite handy in many fields. This is the reason why it is adopted by so many people.
However, with such wide adoption Privacy issues also arise, requiring proper protection. You can easily password protect your PDF file so only the person who has the password will be able to see the PDF.
The process is actually quite simple, however, the tools you need for this purpose come with a catch. In this tutorial, we will tell you about both Paid and free methods, you can just choose the one which fits your needs best.
READ ALSO: How to Remove PDF Password Security

Method#1(Paid):Use Adobe Acrobat to Password Protect Your PDF File

This is definitely the most professional tool for this purpose, it will provide reliable protection with Attractive and friendly User interface. However, it only comes with a 30-day free trial after that you will have to pay for the service. The tool comes from Adobe, the maker of many tools we use on a daily basis, directly or indirectly.
Adobe Acrobat is a good option for businesses that depend on PDF and other such files every day and need proper protection for the sensitive data. All you have to do is navigate to Adobe’s Website and either click on free 30-day trial or just buy the product if you want to. The installation process is quite simple, just like any other software.
To protect PDF files with a Password, launch Adobe Acrobat and click on “File” located at the top left corner of the screen. From the menu click on “Open”.
open Now, choose the PDF file which you would like to Password protect and click on “Open” to open the file. You can also open the file directly without launching Adobe Acrobat if you have set Adobe Acrobat as default program for opening PDF files.
select fileAgain, click on “File” and this time choose “Properties…”
propertiesFrom the new window that opens, click on “Security” Tab to see all security options.
securityUnder “Security” tab you will see a drop down menu next to “Security Method:” Click on it and choose “Password Security”.
passwordAnother window will open where you can tick the option “Require a password to open the document”. Once checked, the password field will be accessible.
password areaNow, enter the password which you would like to use to protect the PDF file and click on “OK”.
enter passwordAnother window will pop up to confirm the password. Just type the password again and click on “Ok”.
confirm passwordMake sure you save the changes when you are closing the PDF file, otherwise the changes you made will not be saved and so does the password protection.
Note: If you are going to share the password with someone then make sure you use a password that is different from the passwords that you use for other services.
Completely blocking access to the file might not be necessary in some situations. You also have the option to apply password to specific functions of the PDF file.
To set password to specific functions of the PDF, Tick the checkbox under the heading “Permissions” located in the same “Password Settings”.
checkboxThere you can allow and restrict different functions and at the end provide a password that would be required to access all the functions. Once you have made all the tweaks and set the password, click on “OK” and make sure you save all the changes when you exit the PDF file.
customize settings password

Method #2(Free):Use PDFMate Free PDF Merger to Password Protect Your PDF File

This is actually a PDF merger tool, but it also comes with the option to set a password to the file. The tool comes with both paid and free versions, however, as far as password protection is concerned, you can get that in free version too. The tool is created by PDFMate that is also responsible for many other PDF tools.
However, having a free to use tool also means you will have to live with its downside as well. First issue, it is a merger software not built for actually adding a password to PDF files, it is just one of its feature that can help you set a password. As it is a merger tool, it will create a new file that can be password protected (it doesn’t add password protection to the same file).
The interface is easy, but very unattractive when compared to Adobe Acrobat.The option for “Permissions” are also bit limited as compared to Adobe Acrobat. The tool definitely gets the job done without sacrificing on protection, if you are okay with all the tiny issues, then you can protect your files without spending a penny. Although, it is never recommended for commercial use due to all the flaws.
Just download the software from the PDFMate Website (it’s a 35MB file compared to 700MB Adobe Acrobat file) and launch the program. In the interface, click on “Add files”.
add filesNow, choose the file which you would like to password protect and click on “Open”.
select fileOnce the file is open, click on it to highlight it and tick the checkbox next to “Open Password” under the heading “Security”. Once it is checked, you can add a desired password that will be used to open the file.
add passwordYou can also check “Permission Password” option and add a password to restrict some functions of the PDF file, although it is only limited to Copying, Printing and Editing.
permission passwordIf you just want to add a password to the file and don’t require any merging then it is better to set the Layout option to “1IN1” to avoid any changes. Now, just click on big “Build” button and a new file will be created and showed to you in a folder. The changes will only be applied to new file, the old file will stay the same.
change output settings
 protected file

If there are any questions or you know a better method to protect PDF files, then let us know
Read More »

How to Remove PDF Password Security

                     computer tips.
This instructable will tell you how to remove PDF password security and print, edit, copy, and extract a restricted PDF file.
READ ALSO: how to Password/protect a PDF document


PDF is a file format that is universally used because it can be opened using a number of different programs. Typically an individual does not have to download a special program in order to open up a PDF. This makes it an ideal file for an individual to use to send information. Depending on who you ask the fact that you can apply restrictions on PDF files that prevent people from being able to print, edit, and copy the file can be both a good and bad thing. What if you forget the password or are not able to gain access to the password? They may be a lot of reasons why you need to print, copy, or edit a PDF file and are not able to because you do not have the password.

Fortunately, receiving and opening a PDF file with a password restriction and not knowing what the password is not as earth shattering of a situation as you may think. This is because there is a program called PDF Password Remover that was designed to remove PDF password. The best part is that learning how to remove PDF password security restrictions on printing, editing, and copying a PDF file is something that can be accomplished in just three quick and easy steps.
Note: Trial version of this program has some limitations compared to the full licensed version. I would also like to declare that I'm unaffiliated with the company, it means that I will not receive any commission if you buy this program.

Step 1: Download, Install, and Execute the Program

First, you need to download and install the program called PDF Password Remover. You can also download both Windows and Mac version from this page: http://www.mypdfsolutions.com/ and follow the installation wizard to install it to your computer. It shouldn't take too long to download and install. Once the program has installed onto your computer you just have execute the program and wait for it to launch.
Read More »

Enter your email address:

Delivered by FeedBurner